Come learn the art of 3D computer generated art and animation. This blog deals with the lessons learned and the art created by Robert G. Male using DazStudio from Daz3D.
Also covered are the ancillary software, tools, techniques, and processes needed both before and after rending in the 3D software.
R.M.T.P. Co. is a
company dedicated to quality
Web products without all of
the unnecessary hype. Our
products speak for themselves. Down to earth, easy,
usable, these are the principles
we believe in.
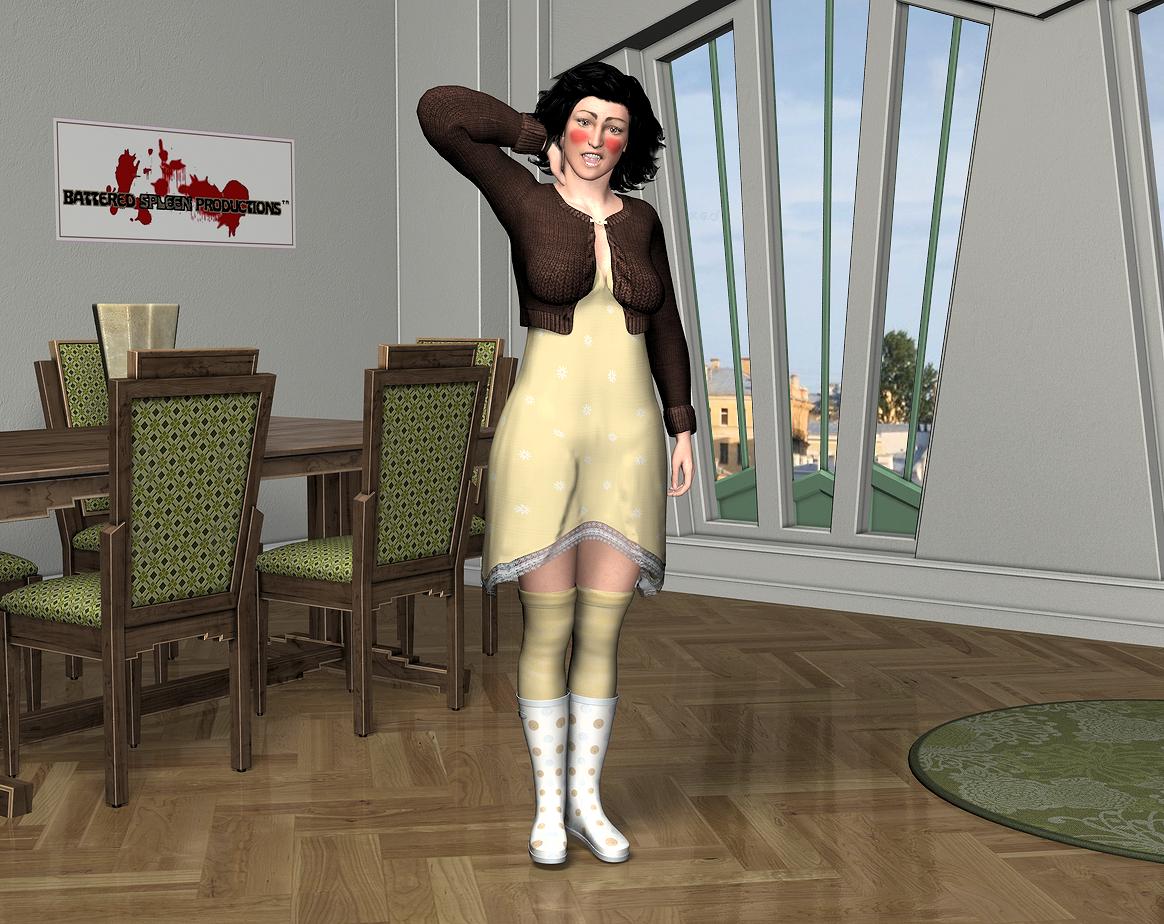
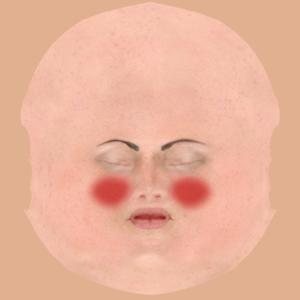
Although I posted first about tan lines, before I ever made a picture with those, I did something similar with blushing. The process isn't all that different, and in fact it goes much quicker. First chose a character map for your figure. Then locate the file for the face surface. For Genesis this is listed as 1_SkinFace in the Surface Tab. Make a copy so you don't replace the original image. In this copy create a raster layer. Draw a shape you want for the blushing on one cheek of the map. I use a selection tool to make the shape. You can vary where the blushing occurs. You can put it across the nose even, but I found that made the person look feverish instead, or as if they had a bad cold.
Once you have your shape fill it in with an appropriate colour like RGB 160 0 3. I then take the shape from the one cheek, duplicate it, flip it horizontally, and place it on the other cheek. Now you use a Gaussian blur on the layer. I chose to do mine with a radius of 57. This smooths out the edges of the shape and gives it a soft, transparent border that blends out to the regular skin. This process makes for a deep, dark, colour blotch, so turn down the raster layer's opacity. I chose an opacity of 62%. Your mileage may vary. Altering the opacity also alters the colour so I went into the Red/Green/Blue controls for the image and set them to Red 13, Green 0, Blue 0. You might also want to alter the brightness and contrast of the layer. By this point you have done nothing to the background layer. Merge the layers down, if you are satisfied, and save the file as a .jpg, a .png or a .tif.
In DazStudio change the 1-SkinFace to the new map and render. In the alternative you can skip the opacity and colour changes and run two renders, one with the blush and one without and using layer opacity changes alter the appearance of the blush that way. I might do it one way with one image and the other with something else. It depends on how it looks. There may even be no difference at all depending on the lights that you use in your render. A person blushes the same colour regardless of the light, but that doesn't always work when rendering a scene. You may also want to consider adding blush to the neck and upper torso if you want. Some people blush that way, others do not. Same thing with most of their head turning bright red. Do it the way that looks best to you and represents the kind of blushing you want to show. Finally, this process also works for welts, hand slap marks, etc--if you work at the more complicated colouring it can do bruises too.
There will be no posts in August. Thanks to having to rebuild my software library I didn't take May off for programming updates. I waited until now. See you in September.


 Although I posted first about tan lines, before I ever made a picture with those, I did something similar with blushing. The process isn't all that different, and in fact it goes much quicker. First chose a character map for your figure. Then locate the file for the face surface. For Genesis this is listed as 1_SkinFace in the Surface Tab. Make a copy so you don't replace the original image. In this copy create a raster layer. Draw a shape you want for the blushing on one cheek of the map. I use a selection tool to make the shape. You can vary where the blushing occurs. You can put it across the nose even, but I found that made the person look feverish instead, or as if they had a bad cold.