Learning Dark Arts

Come learn the art of 3D computer generated art and animation. This blog deals with the lessons learned and the art created by Robert G. Male using DazStudio from Daz3D. Also covered are the ancillary software, tools, techniques, and processes needed both before and after rending in the 3D software.

corners

Spell casting woman.


R.M.T.P. Co.


corners


Newest Article


May 27, 2013

Not For Hair or Sound

Previously we looked at UberArea lights from Omnifreaker. We mentioned how for added realism you could add volumetric effects. Today I'll show you how. This time in your "Content Library" you need to find "Shader Presets" then "omnifreaker" then "UberVolume" to get to the shaders required.

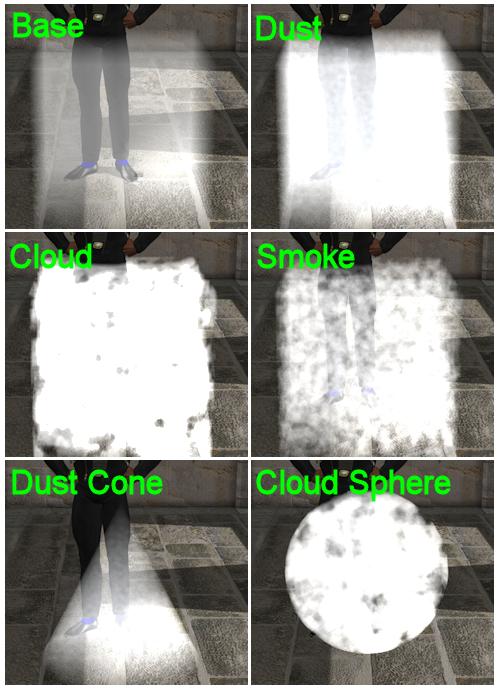
You will want to work with a primitive almost exclusively with this, though I can see some uses otherwise. There is a preset cone and a preset sphere provided along with the shaders. They even come directly parentable to a light--just select the light in your scene and then load that option. I did not find the cone very useful. It's too limited and felt like it grabbed too much light. Whatever you use, the process is the same. You select your primitive (if it isn't preset already) and you go to the Surface tab and select the primitive's surface. Once you have done that load in one of the shaders. You can switch between them later if you like. For my example image below I used the !UberVolume Base, because it picks up the least additional light since it has less substance.


Click to Enlarge

For reference the added light stream items will pick up light from any lights in the scene that come near them, not just the lights you want them to appear to emanate from. They also can develop errors when interacting with the materials of items behind them. I had some of these errors, but I dealt with them by running a render without the building and then overlaying that on a render without the volume cubes that I used. That way you can also add some transparency to that overlay if you want.

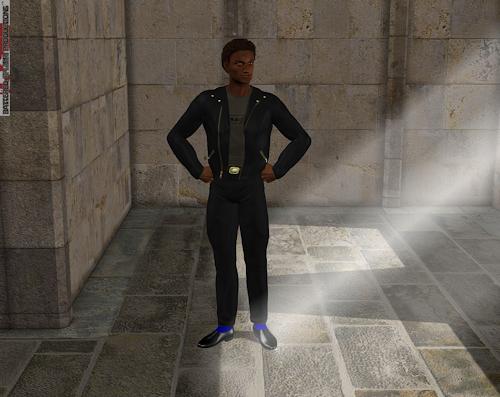
You can see the effect that I've created is not quite perfect, for two reasons. The first is I visually lined up my light streams with the bright spots on the floor. They didn't correspond to the size of the opening creating the light because the distance makes the bright patches larger. That distance and the angle of my lights also made the farthest end wider than the closest end of the light pool. I did not account for this in the light stream either. Without looking too closely I cannot say how easy it is to spot these flaws--this is just to show how it works anyway.

Here are some simple examples of what the effects look like.

Music: Whip It by Devo.
  • Tags: TBA.

See All 0 Comments
and leave your own.

Get Comment Updates by Email


May 13, 2013

Better Orbs and Barns

Very shortly after I posted last week I decided there was a serious flaw in the render that went along with the post. It had nothing to do with the lighting technique, so no worries there. The problem is that there is no indication of the position of the glowing orb in the picture. The shadows tell a story about where the orb should be within the barn, but the orb itself shows nothing of that. I discussed the problem online and some options were determined to help cement where the ball is. Meanwhile I had almost immediately come up with a very simple answer and went in and re-rendered the following version of the scene.

As you can see I added a pool of light directly below the glowing orb. That says where the ball is. It likely should not be the only place the light is seen though. Distances from the objects catching the light, and angles between the light pools and the viewer come into play. To further cement the reality of the ball I included two more lights. All three of those are Spotlights. There is also a likely pool of light directly behind the ball of light, but obscured by the orb and its halo. There is also a Point Light hiding in the sphere to make it brighter, but it has no effect on the lighting in the rest of the scene even if the sphere is removed--the point doesn\'t cast light far enough away. The last effect I added to the scene is a sunburst that is done entirely in postproduction thanks to a handy function in PaintShop Photo Pro.

Click to Enlarge
Click to enlarge.

Some of the other options for giving the viewer a sense of the position of the sphere include the following. Volumetric effects such as visual cones or streams of light emitting from the sphere, such as you might see streaming in through a window. Dust or hay chaff floating in the air showing varying amounts of light. Objects behind and in front of the sphere being blocked and blocking it--not a handy option in this particular scene. Lack of focus or distance blur beginning behind the orb--again requires items at certain positions in the scene, which this one is lacking.

Music: Love by Def Leppard.

See All 0 Comments
and leave your own.

Get Comment Updates by Email


May 6, 2013

A Light Fair Different

I've been experimenting with new lighting techniques. At this point I do not know if the one I want to talk about today comes free with Daz or if I have purchased it somewhere along the line. It comes from Omnifreaker and if it is built-in as I suspect it is found under the "Light Presets" folder then the "omnifreaker" folder and I want to talk about the ones under the folder "UberAreaLight". The first thing you will see there are two items described as shaders, and a number of other options marked as sets. The online help for these leaves something to be desired and seem to be catered toward people who already know what they are doing and need only some reference to work from to use them better.

You can use the sets, but I suggest to start using the first one labelled as a shader. It also has the most versatility later. Here's how it works. Start by putting a primitive into your scene. Use a plane the first time out. This plane is going to be a light, but that is only partially true. What you need to do is select the plane and then go into it's Surfaces. Highlight the plane in the surface tab and then apply the "!UberAreaLight Base". If you do not have the surface selected nothing will happen. What this does is add more controls to the surface of the plane. The first one you need to use may be "Fantom" which makes the plane invisible when rendering, but does not turn off the light like just making the plane invisible will do. One side of the plane will be the light, the other side will be dark. If you use other shapes such a sphere or torus the light will be from all of the exterior surfaces.

When you use a normal light at 100% intensity it provides a lot of light. This is not true of these area lights. They are referred to as shaders because not only do they add to the surface of the object they shade the scene more than they light them. You can increase the intensity to make them more like the traditional lights or you can use the normal lights in addition for their brightness. The area light adds nice shading, shadows, and visual definition to the scene in a subtle way that can look much better than just the regular lights. When you first render with an area light you will get a scene that doesn't look very good. This is because there is a control called "Samples" and it is set low to make for quick rendering. The default is 8 and it produces a lot of thick heavy grain in the render that can make it difficult to judge the amount of light in the scene. You can increase it to 30 to get a better idea. The more samples you want the longer the render time you have. When it comes time to make your final render I suggest at least 120 samples, but I've moved on to 160 samples personally. The very fine grain at this level adds a photographic quality without being obviously grainy.

The area light automatically produces shadows without changing anything, but it has dials--remember they are all in the surface controls of the object--to alter the shadows cast by the light. I do not believe there is any point in using these lights without shadows. The reason I suggest starting with a plane is because then you know what direction the light is going to be cast. If you want or need put a camera perpendicular through the plane to see where it points. The other reason is you can use the plane to represent lighted surfaces like television screens and ceiling lights. You can apply the light base to any object such as an actual television prop, however you cannot guarantee the light will shine out and not inside the prop where it is useless.

I have been experimenting with using a torus as my primitive. It provides less, but varied lighting. The inner ring of the torus doesn't provide as much light as the outer ring. The most light is available from the top and bottom though--the flat surfaces that make it look like a donut. I started using the torus after reading about ring lights used in photography.This is good for doing a portrait style shot. The closer the ring is to your figure the larger the shadow behind it. The light doesn't work like a spotlight though so there are no darker edges to the render. Experiment with changing the size of the torus and it's distance and angle from the subject of your render.

Click to Enlarge
Click to enlarge.

The render to the above and right is using a sphere as an area light. The only other light is a distant light for brightness. All shadows are caused by the sphere. The only postproduction work was done to create the ball of light and it's corona. I used the sphere light with a map on it and did the opacity in post because opacity on the light has adverse effects.

Music: The Chemical Wedding by Bruce Dickinson.

See All 0 Comments
and leave your own.

Get Comment Updates by Email


Older Articles
corners
corners

About Me

Robert G. Male

Name: Robert G. Male
Location: Ontario, Canada

See Full Profile

corners

corners

Links

corners

corners

Recent Posts

Tag ListTitle List


Archives

corners


Suggested Reading:

This scary book

available at Battered Spleen Productions™.


Suggested Listening:

This free scary audio book

available at Battered Spleen Productions™.


Learning Dark Arts is a presentation of

Battered Spleen Productions™