Learning Dark Arts

Come learn the art of 3D computer generated art and animation. This blog deals with the lessons learned and the art created by Robert G. Male using DazStudio from Daz3D. Also covered are the ancillary software, tools, techniques, and processes needed both before and after rending in the 3D software.

corners

Spell casting woman.


R.M.T.P. Co.


corners


Newer Articles


January 30, 2012

QR7 - A Storm is Coming

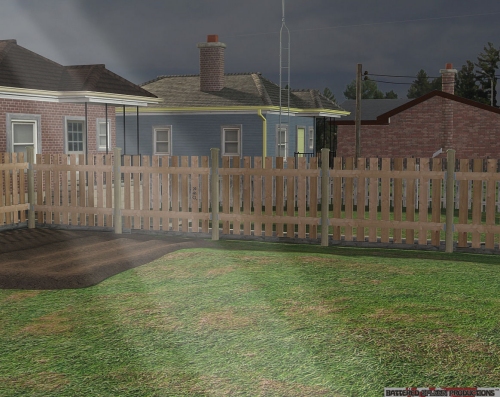
The image below is one of the most recent quick renders that I put together. I did a fast little post work light shaft to add some verisimilitude to the lighting, and because I think it looks good. I might work on making the demarcation between the centre of the beam and the resulting light haze less distinct, but I am not sure yet what process I will use. Looking at it further maybe it is fine the way it is.

Music: Bad Boy by Quiet Riot.

See All 0 Comments
and leave your own.

Get Comment Updates by Email


January 23, 2012

By No Other Fix Would Look As Sweet

Hello. My name is Robert and I am a sweetening addict. No, not sugar or Splenda or ever Aspartame. No, I'm talking about image sweetening. Are your renders dull and dingy? Do you want them brighter and to really pop when your audience views them? Then you need to learn the techniques of image sweetening.

While this is the first post of 2012 for this blog this is my second blog to get a post. As I said in the other, I have taken to posting a look back and then a look forward at the start of a new year for my blogs. This time however I am not affording myself the luxury of that slow kind of start. It's time to jump right in with both feet.

Back to sweetening, ever since I bought a copy of PaintShop Photo Pro X3 I have had access to a Smart Photo Fix function. It has made the job of sweetening my images not only easy, but also a practical requirement. The final product just looks so much better. It also doesn't help that every new version of DazStudio seems to result in darker and darker renders unless the light source is so bright that it obliterates much of the detail of the figures. I believe I have been lighting the scenes the same as before or better, but to get light where I want it ends up with too much light for lighter surfaces. Simple brightness and contrast tweaks to the rendered image just don't cut it for me anymore, I need more control.

This photo fix functionality of PaintShop brings a small handful of tools together in one slider driven control panel that is applied all at once, starting with an immediate preview before running the changes. There are Brightness controls, the first of which is for the overall brightness. This is followed by a slider to increase or decrease the brightness of the Shadows in the image and then another slider to do the same for the Highlights or brighter parts of the image. These controls are also elsewhere in the program. There is then a Saturation slider and the one slider for Focus to Sharpen the image. I have only found a Sharpen function elsewhere with preset increases that work differently than here, not a user-controlled filter. Then lastly there are Black and White balance controls that work differently than the Brightness controls but don’t ask me how they work.

I have some more quick renders I want to post in the coming weeks, but I wanted to do a talky first and this was something that was on my mind. Watch this space for more art and more talk of how I make it.

Music: Seven Seas of Rhye by Queen.

See All 0 Comments
and leave your own.

Get Comment Updates by Email


Older Articles
corners
corners

About Me

Robert G. Male

Name: Robert G. Male
Location: Ontario, Canada

See Full Profile

corners

corners

Links

corners

corners

Recent Posts

Tag ListTitle List


Archives

corners


Suggested Reading:

This scary book

available at Battered Spleen Productions™.


Suggested Listening:

This free scary audio book

available at Battered Spleen Productions™.


Learning Dark Arts is a presentation of

Battered Spleen Productions™