Come learn the art of 3D computer generated art and animation. This blog deals with the lessons learned and the art created by Robert G. Male using DazStudio from Daz3D.
Also covered are the ancillary software, tools, techniques, and processes needed both before and after rending in the 3D software.
R.M.T.P. Co. is a
company dedicated to quality
Web products without all of
the unnecessary hype. Our
products speak for themselves. Down to earth, easy,
usable, these are the principles
we believe in.
I've been experimenting with new lighting techniques. At this point I do not know if the one I want to talk about today comes free with Daz or if I have purchased it somewhere along the line. It comes from Omnifreaker and if it is built-in as I suspect it is found under the "Light Presets" folder then the "omnifreaker" folder and I want to talk about the ones under the folder "UberAreaLight". The first thing you will see there are two items described as shaders, and a number of other options marked as sets. The online help for these leaves something to be desired and seem to be catered toward people who already know what they are doing and need only some reference to work from to use them better.
You can use the sets, but I suggest to start using the first one labelled as a shader. It also has the most versatility later. Here's how it works. Start by putting a primitive into your scene. Use a plane the first time out. This plane is going to be a light, but that is only partially true. What you need to do is select the plane and then go into it's Surfaces. Highlight the plane in the surface tab and then apply the "!UberAreaLight Base". If you do not have the surface selected nothing will happen. What this does is add more controls to the surface of the plane. The first one you need to use may be "Fantom" which makes the plane invisible when rendering, but does not turn off the light like just making the plane invisible will do. One side of the plane will be the light, the other side will be dark. If you use other shapes such a sphere or torus the light will be from all of the exterior surfaces.
When you use a normal light at 100% intensity it provides a lot of light. This is not true of these area lights. They are referred to as shaders because not only do they add to the surface of the object they shade the scene more than they light them. You can increase the intensity to make them more like the traditional lights or you can use the normal lights in addition for their brightness. The area light adds nice shading, shadows, and visual definition to the scene in a subtle way that can look much better than just the regular lights. When you first render with an area light you will get a scene that doesn't look very good. This is because there is a control called "Samples" and it is set low to make for quick rendering. The default is 8 and it produces a lot of thick heavy grain in the render that can make it difficult to judge the amount of light in the scene. You can increase it to 30 to get a better idea. The more samples you want the longer the render time you have. When it comes time to make your final render I suggest at least 120 samples, but I've moved on to 160 samples personally. The very fine grain at this level adds a photographic quality without being obviously grainy.
The area light automatically produces shadows without changing anything, but it has dials--remember they are all in the surface controls of the object--to alter the shadows cast by the light. I do not believe there is any point in using these lights without shadows. The reason I suggest starting with a plane is because then you know what direction the light is going to be cast. If you want or need put a camera perpendicular through the plane to see where it points. The other reason is you can use the plane to represent lighted surfaces like television screens and ceiling lights. You can apply the light base to any object such as an actual television prop, however you cannot guarantee the light will shine out and not inside the prop where it is useless.
I have been experimenting with using a torus as my primitive. It provides less, but varied lighting. The inner ring of the torus doesn't provide as much light as the outer ring. The most light is available from the top and bottom though--the flat surfaces that make it look like a donut. I started using the torus after reading about ring lights used in photography.This is good for doing a portrait style shot. The closer the ring is to your figure the larger the shadow behind it. The light doesn't work like a spotlight though so there are no darker edges to the render. Experiment with changing the size of the torus and it's distance and angle from the subject of your render.
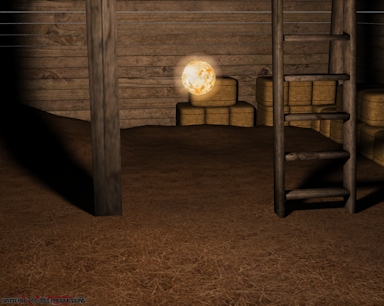
The render to the above and right is using a sphere as an area light. The only other light is a distant light for brightness. All shadows are caused by the sphere. The only postproduction work was done to create the ball of light and it's corona. I used the sphere light with a map on it and did the opacity in post because opacity on the light has adverse effects.