Come learn the art of 3D computer generated art and animation. This blog deals with the lessons learned and the art created by Robert G. Male using DazStudio from Daz3D.
Also covered are the ancillary software, tools, techniques, and processes needed both before and after rendering in the 3D software.
R.M.T.P. Co. is a
company dedicated to quality
Web products without all of
the unnecessary hype. Our
products speak for themselves. Down to earth, easy,
usable, these are the principles
we believe in.
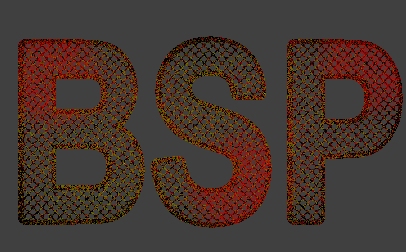
Recently a tutorial came to my attention through Twitter. It was for text done in metal shades and corroded. It used functions in PhotoShop that I do not have access to in my old version of PaintShop, and are not present in free programs like GNU Image Manipulation Program (GIMP). I set about duplicating their effect as best I could. What I have come up with is slightly different, but I hope just as impressive. Here it is.
Start with a black background and make an X of five white circles, just like the 5 on a six-sided dice. You can do this by putting circles onto the corners of a square and one in the middle as in 1). Using the rectangular select tool cut through the middle of four outer circles until you have what looks like a four sided cog just like 2). Trim the image down to the selected portion. Scale this cog down to about 9 by 9 pixels--adjust size as necessary for the size of your text that looks best--as in 3).
In a separate image lay down your black text on a white background. A plain font like Arial works best given the next stages and to make the holes look best. Take your magic wand tool (or select by colour tool) and select your text. Cut and paste it into a new image. Now take the wand tool and give it a feather of 5--so it grabs five pixels outside of the selected letters. Now delete this over sized selection making sure your background colour is black. This makes the letters larger. Paste back the smaller letters and put them in the middle where they used to be. Keep the selection on these smaller letters within the larger letters.
Take your paint tool and set it to paint a pattern. Select your small 9x9 cog as the pattern and paint the smaller letters. Now take the magic wand again, with the feather turned to zero again and select the letters. This should grab the outer border and all of the hole filled part that is black. Don't have the colour tolerance set too high on the magic wand. Now you have your text with holes in it and a border around it. It should still be selected. Now take the Airbrush or Spray Paint tool. Set it to a size of over 100 pixels but less than half of your entire text section. Set the density of paint drops to anywhere between 10 and 30. The opacity should be about 50%. If there is a figure for Hardness set it to 60%. The colour should be a dark gold colour with RGB 128 128 0 or in Hex #808000--you may want to make it darker than this but with a colour replacer you can adjust that later. Lightly airbrush the text in stages until it looks a mottled gold and black. It shouldn't be too "colourful". Then change your colour to a dark red colour with RGB 130 0 25 or in Hex #820019. Airbrush the text again lightly in stages until you have the kind of rust colour you are looking for.
At this point you can alter the brightness and contrast of the entire image--you can leave the selection tool on--until it looks good. Now, you can take your colour replacer tool and change the white background to a darker colour that compliments the rust colour. Grey is best. The background can be changed to RGB 192 192 192 or in Hex #C0C0C0--or RGB 64 64 64 or in Hex #404040--for best results. Invert your selection now so that everything except the rusty text is selected. Set the colour tolerance for the Colour Replacer to about 172, this should remove any white bits in the holes of the metal. The rust colour and the text in general should really pop now. Remember to adjust that gold colour if it's still too bright.
There are two ways to go now. First with the selection of just the text and not the holes--invert again from how it was in the last step--and create a Drop shadow if you want one. Otherwise if you want you can turn off the selection now and instead select everything that is not the text or the holes. This is for painting blood on this rusty metal text. The blood is put on with the Airbrush tool with a density of about 35. The colour should be a medium red with RGB 192 0 0 or in Hex #C00000. Darken the blood colour as desired. Put it like large splotches, or as desired. Since the holes are not selected blood will get in the holes. This may not work so well with the drop shadow included as well. If you want both select the text with grid, but not holes, and paint the blood only on the text, not through onto the drop shadow.