Come learn the art of 3D computer generated art and animation. This blog deals with the lessons learned and the art created by Robert G. Male using DazStudio from Daz3D.
Also covered are the ancillary software, tools, techniques, and processes needed both before and after rending in the 3D software.
R.M.T.P. Co. is a
company dedicated to quality
Web products without all of
the unnecessary hype. Our
products speak for themselves. Down to earth, easy,
usable, these are the principles
we believe in.
For a long time now I've been making images with two or more renders involved to get everything lit the way I want it. Often it involves a dark render and a light render by way of changing light intensities. Sometimes it involves extra lights to cast additional shadows. These images are then edited together in postproduction. The basic Daz Studio lights have a real tendency to only light one direction properly, often leaving certain walls, or worse, floors unlit without using multiple lights that then ruin the appearance of figures and props. This makes for more work in postproduction.
Lately, I have been doing this process with less selection/cut and paste work to get only certainly surfaces lit differently. This is thanks to more advanced lights. It can still be advantageous though to render just the figures and certain props all on their own and saving this additional render as a .png, which keeps the opacity. There is one catch though. Some of these lights react with other surfaces in the scene. This requires going back to drawing outlines around specific items and surfaces with a selection tool because the render is lit terribly without those reactions. I have put together a process to go back to the easier opacities straight out of the render. All of this postproduction work is done using terms specific to PaintShopPro X5, but should be similar in Photoshop or even G.I.M.P.
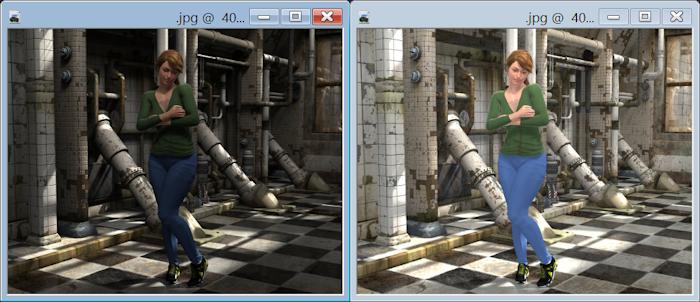
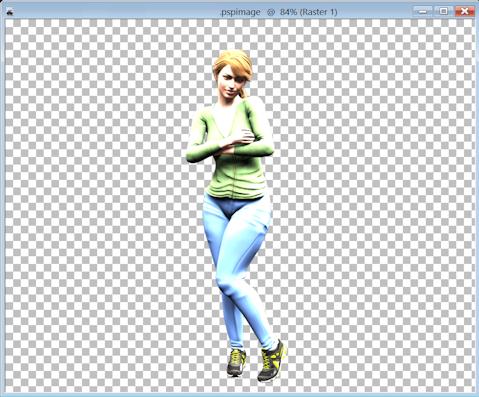
You need to make three renders in Daz. The first is your basic shot and is too dark. The second is with the intensity of certain lights turned higher to make the overall scene brighter, but more importantly to make some surfaces much brighter. The third and final render is of only the figure in the scene to be saved as a .png file as I mentioned about. Then here is what you do...
Take the dark image and make it the "Background" layer.
Add the second image into a new layer, Raster 1.
Add the transparency with only the figure into it into another layer, Raster 2.
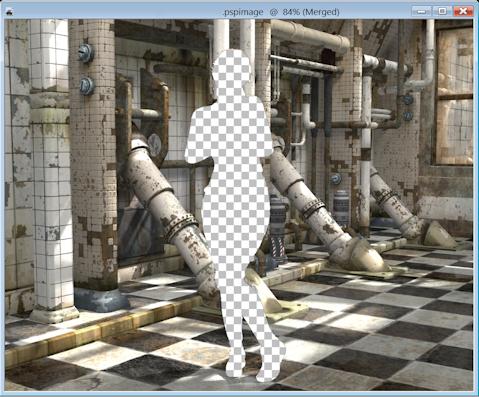
Select the blank space around the figure in Raster 2 as close as possible to the figure. In PaintShopPro X5 I switched from "Perceptual" selection mode to "Opacity" selection mode.
Invert the selection so that the figure is highlighted. Delete the selection. This makes the entire layer empty but keeps the selection outline intact.
Turn off the visibility of the Background layer, and merge all visible layers (Raster 1 and Raster 2). You now have Raster 1 with the selection from from Raster 2 available.
Without touching the visibilities cut the figure out of the new merged layer.
Create a new layer, Raster 3. Place the figure in Raster 3. Select the blank space around the figure again, but with a Feather of 2 or 3 and use the Soften adjustment. This makes the edges less stark and they blend into the background just a little bit.
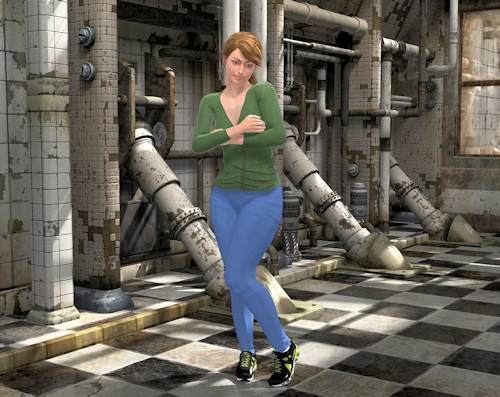
Make the Background layer visible again.
You now have the dark background layer, the bright room layer, and the bright figure layer. Adjust the opacity of the merged layer and Raster 3 to suit your tastes. For instance I set the merged layer at 43% opacity and the Raster 3, the figure, at 87% opacity. Right now you are just setting the opacities to make each layer look good contrasted to each other. If you're like me you will be adjusting the overall brightness, contrast, and other controls for the final image--always merge all layers before doing this final sweetening, though you can do it on individual layers first before a doing one more, final, pass.
This is my last post of the year so have a Merry Christmas, Happy Hanukkah, Happy Kwanzaa, or a great Yule. Then when that's done have a Happy New Years and I'll see you in 2014, but not too early. ;)